The Pinhole Camera: A Simple Revelation
“Who would believe that so small a space could contain the image of all the universe?”
Thus spoke Leonardo Da Vinci as he waxed poetic on the mysteries and wonders of the human eye. He could have just as easily, though, been describing the mysteries and wonders of the camera obscura and its successor, the Pinhole Camera.
The methodology of pinhole optics was first recorded back in the 5th century B.C. when the Chinese philosopher Mo Tsu noticed that images appeared inverted when projected through a small hole or ‘pinhole’ in a darkened room. He later referred to this as a “collecting plate” or “locked treasure room”.
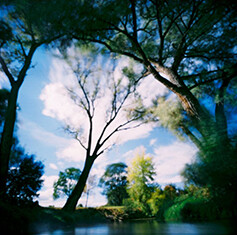
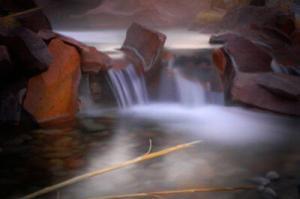
—Photo courtesy of Jody Akers
A century later, Aristotle noted that “sunlight traveling through small openings between the leaves of a tree, the holes of a sieve, the openings of wickerwork, and even interlaced fingers, will create circular patches of light on the ground.” (It is not known whether the great philosopher pursued the idea much beyond this observation.)
It was during Leonardo’s study of perspective in the 16th century, that the first technical description of pinhole projection appeared in his collection of notebooks, the Codex Atlanticus:
“When the images of illuminated objects pass through a small round hole into a very dark room…you will see on paper all those objects in their natural shapes and colors…Here the figures, here the colors, here all the images of every part of the universe are contracted to a point. O what a point is so marvelous!”
Translated from its original latin, camera for “room”, obscura for “dark”; the camera obscura can be any sealed, lightfast enclosure with a hole to admit ambient light, and an opposing inner surface to reflect and view the projected image. To a more or less degree, every illuminated object reflects light. The pinhole allows this reflected light to pass through the small opening (relative to the enclosure’s size) and project a perfectly linear, distortion free, albeit inverted, reflection of the subject.
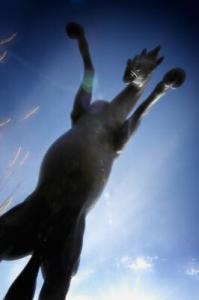
—Photo courtesy of Jody Akers
Later refinements saw the addition of lenses and mirrors within the enclosure to ‘right’ the upside-down image—photographic principles that are still in use today.
A pinhole camera can be almost any size and constructed out of virtually anything in which you can place emulsion in and poke a [pin]hole. Egg shells, peanut shells, hollowed out peanuts, soup cans, spam cans, oatmeal boxes, old Macs, old cameras; the list goes on…
Justin Quinnell, a photographer in Great Britain, has devised a pinhole camera for your mouth. He’s dubbed it the “Smileycam”. And then there’s also the garbageman from Germany who’s turning dumpsters into pinhole cameras. What does he call it? The “Trashcam”, of course.
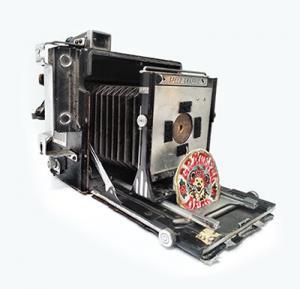
Photographer Jody Akers converted this old Speed Graphic into a Pinhole camera. Note the Grateful Dead patch “shutter”. — Photo by Greg Osborne
A popular small-form pinhole is this 35mm film canister method.
The largest camera obscura in the world—the Camera Obscura in Aberystwyth, Wales, boasts a fourteen inch lens and reflects a 360 degree sweep of the surrounding sea and landscape. Yes, you can literally stand inside the camera/building!
Aside from the mere entertainment value of the camera obscura, some of the Renaissance and Dutch masters were reputed to have used this device in the creation of some of their most celebrated works, allowing them to achieve near photo-realistic, distortion-free perspective in the layout and composition of their paintings.
The transformation of the camera obscura from a viewing and drawing tool, to a true recording device, happened in 1850 when Scottish scientist Sir David Brewster took the first known pinhole photograph. He is also believed to have coined the term “pin-hole” in his 1856 book, The Stereoscope.
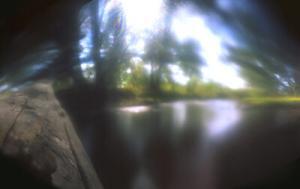
—Photo courtesy of John Harris
With the addition of the film component, the pinhole camera was born.
Today, pinhole art is considered a legitimate sub-genré of photography. In addition to its place in art, pinhole cameras have proven their value to the hard sciences through their use in space flight and for high energy photography in the nuclear industry’s laser plasma research.
Perhaps the defining characteristic of the pinhole is the absence of a “proper” lens. With only the atmosphere separating emulsion and subject, the camera’s depth of field is nearly infinite, wide angle images appear almost distortion-free.
Sounds simple enough, but the Pinhole is hardly without its quirks. Since the device operates without a viewfinder, framing ones subject can be a hit or miss proposition. Once, however, the photographer gains familiarity with his/her chosen camera, they will gain a feel for position and placement.
—Photo courtesy of John Harris
This placement, along with timing and exposure, relies heavily on the artist’s intuition and expertise. “Shutter” operation is a manual proposition, to say the least. Methods run the gamut, from electricians tape to, in the case of photographer Jody Aker’s modified Speed Graphic—a velcroed-on Grateful Dead patch.
Despite what some would call “limitations”, many accomplished fine art photographers revere this simplistic approach to their craft for the stripping away of technology that, may or may not, help in the creation of photographic art.
Twenty years ago, noted Colorado lensman, David Sharpe, felt “boxed in” by the sometimes tedious nature of traditional photography. He liked the way the Pinhole allowed for a more poetic interpretation of his subject matter—without the often cloying technology that had come to define modern photography. Hooked for good, Sharpe embraced the pinhole aesthetic and never looked back.
Although he agrees that the pinhole leaves a lot to chance, Sharpe actually likes not having to look through the viewfinder, relying instead on the intuitive feel that the pinhole requires of its adherents. “I love the alternative approach; the softer, not as ‘dead-on’ nature of this medium.”, David observes.
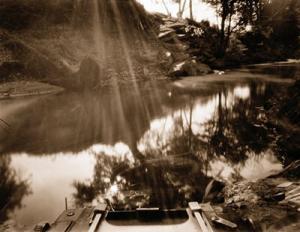
“Waterthread 24” by David Sharpe
Sharpe’s platform of choice is the “small-form” film canister pinhole. Typically, he will bring 16 to 19 of these set-ups on photo excursions. Experimenting with different focal lengths and short exposure times, David has achieved amazing results with what he calls his “pinhole instamatics”.
Often, an artist will, at some point in their career, decide if they are photographing for the image or for the process. Many artists will agree that the process IS the art, or at least as important as the final image itself. The beauty of the pinhole camera, is that it lends itself so well to this creative process by almost forcing one to engage the subconscious creative power that technology often subverts.
The pinhole camera doesn’t overwhelm or try to ‘lead’ the artist with endless technology-driven choices. It is a collaborator that, by way of an almost misleading simplicity, works with the artist to reveal the art within.
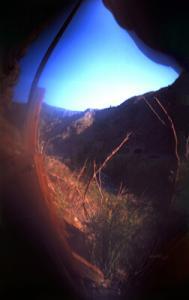
“Waterthread 1” by David Sharpe
Sound intriguing?
Get Pinholed!
You don’t have to be a professional artist-type to enjoy the existential rewards of Pinhole Photography
April 28th is Worldwide Pinhole Photography Day. To celebrate, we have made this week’s Facebook Photo Theme, drumroll please… “Pinhole” Drop by our Facebook Page and show us your stuff.
The Last First Friday of MoP
No Comment
Artist's Featured ProjectsFeaturedFeatured Works - Sharing The PassionLatest ArticlesOur Team And Happenings
 First Friday Art Walks in Denver are always a blast. The galleries open their doors to the public for later the normal viewing and a little “wine and cheese” type atmosphere. Whether you are in the Santa Fe Art District, known as the hub of the Denver art scene, or any of the seven others around town, you are bound to see amazing art and some fascinating characters.
The creative community in Denver is
Sticking Your Art Where It Doesn’t Belong; The Big Picture Project
No Comment
Artist's Featured ProjectsFeatured Works - Sharing The PassionLatest ArticlesOur Team And Happenings
The Month of Photography is upon us! One of the events in Denver, Colorado for 2013 is The Big Picture street art project. Led by local photo impresario Mark Sink and co-hosted by Art-Plant and Artwork Network, The Big Picture plans to paper the outside walls of buildings around Denver with large format prints of images from local, national and international photographers. The first Big Picture in 2011, exchanged images not only with cities around the United States, but cities in South America, Switzerland, England, China, Mexico, Canada, France and Germany. The 2013 Big Picture will be sending and receiving photos from across the U.S.A. and around the world!
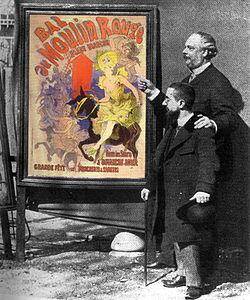
Toulouse-Lautrec with on of his posters for the Moulin Rouge
“Street Art” is generally defined as: ‘art, often political or dealing with social themes, displayed on streets, sidewalks or walls of public spaces and often without permission of the property owner.’ There are quite a few types of media used in the creation of street art. The medium we normally associate with street art – paint, is actually fairly new on the scene. Bansky, building on the earlier paint-and-stencil work of John Fekner and Blek Le Rat has, over the past 15 years, become the most well known artist in that genre.
The medium of wheat-pasting paper on walls dates back to the nineteenth century and was used mostly for commercial purposes: advertising of products and events, especially circuses. Art and commerce began to merge in the 1890s when Toulouse-Lautrec’s posters for the Moulin Rouge, theaters and other events, papered the walls of buildings around Paris. Ernest Pignon-Ernest took wheat-pasting to a higher level and has been pasting amazing art projects on the walls of Naples,

Shepard Fairey’s 2008 “Hope” political campaign poster
Soweto, Brest, Ramallah and more since the 1960s. In the United States, Shepard Fairey gained notoriety as a sticker and wheat-paste artist with his “Obey Giant” series and achieved national recognition with the 2008 Obama “Hope” poster.
Computers and wheat paste have joined forces to bring photography to the streets. Photo files submitted to the Big Picture are being emailed around the world to sister cities in the project. The files are then printed and pasted locally. The Colossal Reed Art & Imaging Galactic Headquarters (CRAIGHQ) building at the corner of North Ninth Avenue and Federal Blvd., was the first Denver location to be pasted to kick off The Big Picture Project for 2013. Mark Sink, Peter Davies and others in the Big Picture pasting crew were joined by Gary Reed, Barb Pullin, Jody Akers, Bob Jewett, and Merhia Madsen (and her daughters Annabelle and Maggie) from Reed Art & Imaging to put the first batch of images up on the walls. The work at Reed isn’t complete! In addition to more Big Picture images to arrive, Reeds’ employees will be pasting the building with their own fine art images in the weeks to come. Also to be included will be several images from the winners of Reeds’ recent facebook contest held in honor of The Big Picture Project and the Month of Photography. Make sure you stop by to see what’s new!
The Big Picture website will be posting a map of the locations where images have been pasted locally and around the world. Look for it so you can take your own tour and see the amazing art prints posted on the walls about town! If you’d like to get in on the project, Big Picture is taking submissions through March 15. So hurry on over to the Big Picture website for all the details and get your photographs on the street!
Click to see the e-book of Big Picture Project images from 2011, and watch for the 2013 book due out later this year!
Additional Links:
The Big Picture Facebook page has plenty of pictures of the pasting at Reed Art & Imaging.
Fresh Art Photography will be taking part in the Big Picture project.
YouTube: Ernest PIGNON-ERNEST – Les peintures urbaines (4:42) A retrospective of Pignon-Ernests’ wheat paste installations in HD!
One of our own
Do you love your job? I do! Working at a fine art reproduction studio I get to work with artists everyday, but not just my clients. At Reed, we are artists working for artists.
One of my coworkers, our Master Printer, Bob Jewett is one of several artists on staff here. His art is breathtaking, wild and
Walker Fine Art Gallery Contemporary Art Denver

Walker Fine Art Gallery Contemporary Art Denver is one of many galleries around the Denver metro area hosting MoP (Month of Photography) artists. The space is bright and open and the art on display is extraordinary.
Featuring photography by Sally Stockhold, Andrew Beckman, David Agee and Robert McConnell.
Month of Photography at Bardo Coffee House
No Comment
Artist's CenterArtist's Featured ProjectsFeatured Works - Sharing The PassionLatest ArticlesOur Team And Happenings

Bardo Coffee House at 238 South Broadway in Denver has an exciting show featuring 3 fantastic artists for the Month of Photography. The show titled Sensual Fiction at the Bardow highlights 3 female artists at their best.
Curated by Richard Peterson for Month of Photography, the show features photographs by Terri Bell, Valerie Photogoddess and Wendi Schneider.
A recent outing with several members of the ReedArt & Imaging TrueArt team gave the show (and the lunch with coffee) a unanimous two thumbs up. Drop by Bardos for a cup of coffee, the friendly service, and the fantastic fine art photography.
The show hangs through April 1, 2013.
Artwork by: Wendi Schneider


Giclee Fine Art Printing – Getting a Great Print Part 1 – Photography of Artwork
A Pigment print is a bit more than just an inkjet print. So what makes it fine art worthy? To qualify, the print must be achieved using archival grade pigmented inks on archival grade fine-art paper or canvas. While we love the look of the watercolor papers and canvas papers we don’t suggest using Giclee “photo papers”. For aesthetic reasons, we recommend that the artist get a fine art photographic print for that. But the quality of the fine art pigment print is not limited to the inks and papers you use. There is quite a bit more that goes into the craftsmanship than just the print alone.
There is a great many details that should be tended to, but the major areas can be broken down like this:
Photography of your artwork
Working the file before testing
Generating a worthy test print
Working the file again to refine the proof
Printing the final units or series
Each of these is important to understand so they may become an effective part of your workflow. Since there is a great deal of information to pass along, I’ll split the content into a multi-part series.
Photography of art work
Every step in the production chain of your fine art edition is critical, but some steps, if improperly done, can be disastrous to the final viewer experience. The first step, photography of your artwork, is an excellent example. This step is the largest determining factor to the faithful reproduction of your original art. To create a great pigment print, the photography of the artwork should be:
- Focused properly using high-end lenses
- shot using a strudy tripod in a vibration free environment
- photographed using the sweet-spot of the lens
- in some cases, polarized light and or special lens filters may be required
- exposed correctly with a critical attention to detail
- evenly lit using the proper lights
- correctly white balanced
- shot in the proper file format and with sufficient resolution
- shot in a colorspace that is large enough to capture the full range of the painting and supports the full range of the Pigment print
The right glass
Shooting with inferior lenses may result in various distortions, such as smearing around the edges, chromatic aberrations – where some colors focus differently than others, barrel or pin-cushion distortion, lens flares and overall lack of saturation and/or contrast. Shooting with prime lenses and pro-level equipment will provide the highest possible image integrity and result in a file that achieves the closest honesty to the original.
 Chromatic aberrations of cheaper lenses result in out of focus images with color fringing. |
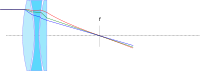 Proper apo-chromatic focus results in all wavelengths (colors) focusing on the same plane for maximum sharpness and detail. |

Bottom photo clearly shows effect of apo-chromatic aberrations.
Distortions, or bending of the image are another issue with lesser quality lenses with “pincushion” and “barrel” being the most common. Pincushion distortion has the effect of the center of the image being further away than the edges while barrel distortion is just the opposite. With barrel distortion, the center of the image appears closer to the viewer than the edges.
 Pincushion distortion created converging lines towards the center of the image |
 Barrel distortion creates diverging line near the center of the image |
A quality image capture is not dependent exclusively on a good camera/lens combination.

A high quality pro level tripod is a must for the artist who is serious about photography of art, and they are expensive.
All elements in the photographic process are important. For example: how the camera and art work are handled during the exposure process will add a measurable difference to the final product.
A good solid vibration free tripod is a must-have if you are serious about photographing your own work. Any vibration in the camera or the original artwork during exposure will result in “motion-blur” that will visibly carry over to your reproduction prints. While lesser tripods may be appealing just because of their price, they are susceptible to vibration, “ringing”, sagging and slipping during exposure. Think of it this way, if cheapo gear would lead to professional results, then why would there be a need for “pro” gear, and why would the pros invest the top grade gear?
If you want to get the best looking print, and your are committed to doing your own photography of your art do yourself and your art buyers a big favor and use the gear that will get you fine art quality instead of drugstore quality.
A stable support for your artwork is equally important. Any movement in your art during exposure will result in motion blur issues that will leave the image looking out of focus or double-exposed. While it may be tempting to take your art outdoors for the photo session, keep in mind that your painting is much like a sail in the wind. The slightest breeze will result in movement in the artwork. Heavier breezes or gusts may damage your art. And shooting with only one light-source, such as the sun, does not provide even lighting across the entire painting. I know this sounds crazy, but it has to do with what is called “angle of reflection” This is basically a measurement of the angle the light-path takes as it reflects away from the subject towards the viewer or camera and it is always equal to the angle of incidence (the angle the light path takes to get to the subject).

The propensity of light falling on a subject will reflect away at an angle equal to that of it’s source.
Light falling on your canvas is more likely to scatter in a direction away from the light source. So let’s take the example to the right. The light source, in this case the sun, is to the left of the painting and the camera is directly in front of it. As we move across the canvas from left to right, we have less light reflecting in the direction of the camera lens. This results in the right side appearing darker than the left. This is called “fall-off”. Our eyes and brains adjust for fall-off for us, so we tend not to see it with the naked eye. While much of the light will “scatter” off in multitudes of directions, it is not enough to eliminate fall-off.

Since our light source is high and to the left of the subject, the brightest area will also be high and to the left.
Shooting indoors gives you the greatest control over your environment for lighting and stability. When possible, setup your tripod on a concrete floor. Wood floors have flex and tend to amplify vibrations like a spring-board. If you must setup on a wooden floor, try to locate the load bearing supports under the floor and set your tripod in that area to minimize vibration. The farther you are away from the supports, the more amplified the vibrations.
Stay tuned for the next post in the series on Proper Lighting and Exposure. You can subscribe to our newsletter or via RSS to be notified automatically.
Beautify Your Photographs While Making a Great First Impression
We were recently introduced to a new type of laminate for photographs, ink jet and poster prints we call “Crystal” for its faceted like surface. This is very different than a normal gloss or lustre coating. Being 5 ML thick with full UV protection, this laminate is extremely durable. We put it to the test for over 2 months and found it to be one of the toughest cold mount poly laminates we have seen. Our test clients loved it immediately and all but demanded we add it to our lineup of products. No doubt about it, the blacks are much richer, colors have more pop and the image has more depth and clarity. We first started offering this product strictly on our Gallery Mounts because it is tough enough to go through our edging machine and not show any scuffs or damage.
Now, we have make it available for any print mounted to any type of substrate. Fine art prints from wildlife and scenic’s to abstracts and commercial prints never looked richer or have had better protection. Check out our samples at the lab or if you are out of town just call us to have one sent out to you. My personal recommendation for an incredible eye catching, heart stopping, WOW kind of print is to put this laminate on Kodak Metallic paper. Although it also looks great on Fuji Crystal Archive C print paper and Fuji Flex, the Metallic is killer.
How to Get Great Color, Save Profits, and Never Have to Work Color or Density in Photoshop or Lightroom. Part 1
I’m going to fill you in on the secrets of how to get great color, save your
profits, and never have to work color or density in Photoshop. All without
the use of ICC profiles, confusing work-flows or batch conversions.
If you understood the above and it applies to you, chances are you are a
professional photographer. Professional print quality is much easier to achieve
than most photographers are aware.
Getting there requires Five crucial elements. With these five in place, you can go
directly from camera to print and get excellent results.
Yes, that’s right, higher profits and more free time with:
No Photoshop work.
No profiling magic.
No bag of tricks or fairy dust.
Rule #1 – If you have to adjust the density of your files, your metering is inaccurate.
You may find this hard to believe, but truly consistent spot-on exposures rarely come
from TTL metering. I know that’s tough to swallow, but reflective metering is just too fallible.
Don’t believe me? Here is a simple test to see if this rule applies to you.
1. Take a look at the average corrections you are making on your files in
Photoshop or Lightroom.
2. Jot down the number of exposure corrections you make in a work week.
3. If the answer is any higher than zero, guess what, I’m right – your TTL has failed you. So how do we correct this?
Get a GOOD new or used hand held incident flash meter, and calibrate it to your
camera using Will Crockett’s “Face mask Histogram Technique” copy and paste
the following web address into your browser: Go to
http://www.shootsmarter.com/index.php?option=com_content&task=view&id=116&acat=16
Keep in mind that digital cameras have only 1/8th stop of exposure latitude. If you
have an incident meter, compare it against Will’s meter reviews and see how it rates. Some
well known meters are unprofessionally inconsistent . Up to a horrible deviation of +- 1/3 stop from reading to reading. This is definitely outside of the acceptable range for a professional photographer and enough to put you back in an editing app to tweak density.
After you have calibrated your meter to your camera using the Face Mask Histogram, you have completed the first of a few simple steps towards a more efficient and predictable workflow. Take some test shots this week and fine tune your exposure calibrations to ensure you are keeping your highlight detail while maintaining good shadow detail.
Next time:
Part 2.