Month of Photography at Bardo Coffee House

image

Bardo Coffee House at 238 South Broadway in Denver has an exciting show featuring 3 fantastic artists for the Month of Photography. The show titled Sensual Fiction at the Bardow highlights 3 female artists at their best.

Curated by Richard Peterson for Month of Photography, the show features photographs by Terri Bell, Valerie Photogoddess and Wendi Schneider.
A recent outing with several members of the ReedArt & Imaging TrueArt team gave the show (and the lunch with coffee) a unanimous two thumbs up. Drop by Bardos for a cup of coffee, the friendly service, and the fantastic fine art photography.
The show hangs through April 1, 2013.

Artwork by: Wendi Schneider
image

image

Giclee Fine Art Printing – Getting a Great Print Part 1 – Photography of Artwork

A Pigment print is a bit more than just an inkjet print. So what makes it fine art worthy? To qualify, the print must be achieved using archival grade pigmented inks on archival grade fine-art paper or canvas. While we love the look of the watercolor papers and canvas papers we don’t suggest using Giclee “photo papers”. For aesthetic reasons, we recommend that the artist get a fine art photographic print for that. But the quality of the fine art pigment print is not limited to the inks and papers you use. There is quite a bit more that goes into the craftsmanship than just the print alone.

There is a great many details that should be tended to, but the major areas can be broken down like this:

Photography of your artwork
Working the file before testing
Generating a worthy test print
Working the file again to refine the proof
Printing the final units or series

Each of these is important to understand so they may become an effective part of your workflow. Since there is a great deal of information to pass along,  I’ll split the content into a multi-part series.

Photography of art work

Every step in the production chain of your fine art edition is critical, but some steps, if improperly done, can be disastrous to the final viewer experience. The first step, photography of your artwork, is an excellent example. This step is the largest determining factor to the faithful reproduction of your original art. To create a great pigment print, the photography of the artwork should be:

  • Focused properly using high-end lenses
  • shot using a strudy tripod in a vibration free environment
  • photographed using the sweet-spot of the lens
  • in some cases, polarized light and or special lens filters may be required
  • exposed correctly with a critical attention to detail
  • evenly lit using the proper lights
  • correctly white balanced
  • shot in the proper file format and with sufficient resolution
  • shot in a colorspace that is large enough to capture the full range of the painting and supports the full range of the Pigment print

The right glass

Shooting with inferior lenses may result in various distortions, such as smearing around the edges, chromatic aberrations – where some colors focus differently than others, barrel or pin-cushion distortion, lens flares and overall lack of saturation and/or contrast.  Shooting with prime lenses and pro-level equipment will provide the highest possible image integrity and result in a file that achieves the closest honesty to the original.

Image courtesy of https://upload.wikimedia.org/wikipedia/commons/thumb/4/47/Lens6a.svg/200px-Lens6a.svg.png

Chromatic aberrations of cheaper lenses result in out of focus images with color fringing.

Image courtesy of https://upload.wikimedia.org/wikipedia/commons/thumb/9/91/Apochromat.svg/200px-Apochromat.svg.png

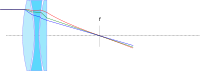
Proper apo-chromatic focus results in all wavelengths (colors) focusing on the same plane for maximum sharpness and detail.


Image courtesy of https://upload.wikimedia.org/wikipedia/commons/6/66/Chromatic_aberration_%28comparison%29.jpg

Bottom photo clearly shows effect of apo-chromatic aberrations.

Distortions, or bending of the image are another issue with lesser quality lenses with “pincushion” and “barrel” being the most common. Pincushion distortion has the effect of the center of the image being further away than the edges while barrel distortion is just the opposite. With barrel distortion, the center of the image appears closer to the viewer than the edges.

Image courtesy of https://upload.wikimedia.org/wikipedia/commons/thumb/5/5b/Pincushion_distortion.svg/200px-Pincushion_distortion.svg.png

Pincushion distortion created converging lines towards the center of the image

Image courtesy of https://upload.wikimedia.org/wikipedia/commons/thumb/6/63/Barrel_distortion.svg/200px-Barrel_distortion.svg.png

Barrel distortion creates diverging line near the center of the image


A quality image capture is not dependent exclusively on a good camera/lens combination.

A high quality pro level tripod is a must for the artist who is serious about photography of art

A high quality pro level tripod is a must for the artist who is serious about photography of art, and they are expensive.

All elements in the photographic process are important. For example: how the camera and art work are handled during the exposure process will add a measurable difference to the final product.

A good solid vibration free tripod is a must-have if you are serious about photographing your own work.  Any vibration in the camera or the original artwork during exposure will result in “motion-blur” that will visibly carry over to your reproduction prints. While lesser tripods may be appealing just because of their price, they are susceptible to vibration, “ringing”, sagging and slipping during exposure. Think of it this way, if cheapo gear would lead to professional results, then why would there be a need for “pro” gear, and why would the pros invest the top grade gear?

If you want to get the best looking print, and your are committed to doing your own photography of your art do yourself and your art buyers a big favor and use the gear that will get you fine art quality instead of drugstore quality.

A stable support for your artwork is equally important. Any movement in your art during exposure will result in motion blur issues that will leave the image looking out of focus or double-exposed. While it may be tempting to take your art outdoors for the photo session, keep in mind that your painting is much like a sail in the wind. The slightest breeze will result in movement in the artwork. Heavier breezes or gusts may damage your art. And shooting with only one light-source, such as the sun, does not provide even lighting across the entire painting. I know this sounds crazy, but it has to do with what is called “angle of reflection” This is basically a measurement of the angle the light-path takes as it reflects away from the subject towards the viewer or camera and it is always equal to the angle of incidence (the angle the light path takes to get to the subject).

The propensity of light falling on a subject will reflect away at an angle equal to that of it's source.

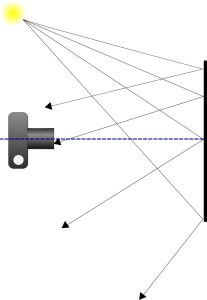
The propensity of light falling on a subject will reflect away at an angle equal to that of it’s source.

Light falling on your canvas is more likely to scatter in a direction away from the light source. So let’s take the example to the right. The light source, in this case the sun, is to the left of the painting and the camera is directly in front of it. As we move across the canvas from left to right, we have less light reflecting in the direction of the camera lens. This results in the right side appearing darker than the left. This is called “fall-off”. Our eyes and brains adjust for fall-off for us, so we tend not to see it with the naked eye. While much of the light will “scatter” off in multitudes of directions, it is not enough to eliminate fall-off.

Since our light source is high and to the left of the subject, the brightest area will also be high and to the left.

Since our light source is high and to the left of the subject, the brightest area will also be high and to the left.


Shooting indoors gives you the greatest control over your environment for lighting and stability. When possible, setup your tripod on a concrete floor. Wood floors have flex and tend to amplify vibrations like a spring-board. If you must setup on a wooden floor, try to locate the load bearing supports under the floor and set your tripod in that area to minimize vibration. The farther you are away from the supports, the more amplified the vibrations.

Stay tuned for the next post in the series on Proper Lighting and Exposure. You can subscribe to our newsletter or via RSS to be notified automatically.


Professional Drum Scanning – What You Need to Know to Be the Smartest Person In The Room

Drum Scans

Color space is determined by the methodology used to create the colors within a file. The most popular of those are:
RGB
CMYK
LAB or a similar space such as YCC
RGB is gaining popularity in the graphics output community. RGB colors are “mixed” using values stated in levels instead of percentages. i.e. 0 to 255 rather than 0% to 100 %. This colorspace can be thought of as a “Transmissive” colorspace as RGB devices use light to image instead of pigments. As your levels increase towards 255, your values get lighter.
Black, medium grey and white in RGB are created from the following mi

Black Medium Grey White
RGB RGB RGB
0 0 0 127 127 127 255 255 255

As you can see, the closer to white (more light) the higher the number.

RGB is a “Device Independent” colorspace, meaning that regardless of the device printed to, a given color in a file will always be made of the same color “mix.”

CMYK is a long standing “standard” but is not a device independent colorspace. This is due to the many variables in the CMYK world. GCR (Grey Component Removal) and UCR (Under Color Removal) can result in the same perceived color being reproduced with several different combinations of Cyan Magenta and Yellow, depending on the level of the Black. These mixes are determined by paper stock, press conditions, inks used, etc. One CMYK file built for a web press, can yield drastically different results when sent to a sheet-fed press, or an inkjet printer. Each of these devices prefers different levels of GCR, or UCR. Creating a CMYK file for one, does not mean it will perform as expected on the other. Because CMYK files are “calibrated” to a specific device, they are referred to as “Device Dependent”. CMYK values are measured in percentages from 0% to 100%. The higher the number, the more ink is laid on the paper during printing. Because each press and paper combination can yield different results, there is no exact formula for a rich black, middle grey, or any other color except for “paper white” which is:

White
C M Y K
0% 0% 0% 0%

There are several formulas that are used throughout the industry as approximate guidelines. These can be obtained from your printer.

Our Professional Drum Scanning is provided in a RGB colorspace file unless otherwise requested. All scanners actually see in RGB, but a CMYK scan is converted on the fly through either hardware or software algorithms. By providing you with an RGB scan, we are allowing you or your service provider to convert the file to CMYK based on their individual requirements, leading to a higher quality product

.

Wholesale Photo-Plaque Opportunities Available

If you have a retail or online business and are looking for a fast selling, highly profitable product, look no further!

Wholesale Photo-Plaques

sfyl logoASignOfWisdom.com has dedicated itself to selling our entire line of photo-plaques!
Choose from Travel, Inspirational, Humorous and Vintage.
To see our entire line, visit  www.asignofwisdom.com. Our line of products is a proven money maker in online storefronts such as amazon or ebay.

How to Setup Your Digital Files

We want you to have the best possible photographic print or fine art reproduction with the least amount of difficulty. For an engaging experience with outstanding results, simply follow the instructions below!

Recommended Working Color Spaces

While we suggest that you convert to profile for all large format prints (LightJet and Giclee Pigment Prints) we provide you the freedom to submit your files in any color space you prefer. The table below shows our recommended working spaces.

GicleeLarge Format Photo (LightJet prints up to 49x120)Enlargements and Proofs (Frontier prints up to 12x18)
Recommended Working Color SpaceAdobe 1998 or sRGBAdobe 1998 or sRGBsRGB

A note on filenames

  • File names must have the appropriate .tif or .jpg extension and must not contain characters such as: \ / :*?”|’~ $ spaces right before the period, bullets or foreign characters.

Monitor Calibration and Color Profiles

  • Let’s start with how you see your digital files. Every monitor is different and changes over time. It’s important to keep your monitor calibrated and as close to output reality as possible. The purchase of a quality colorimeter is a good investment.
  • We calibrate our production displays using the X-Rite i1 Display 2 colorimeter. Our monitors are set to a gamma of 2.2 and a color temperature of 6500k. We use Daylight balanced (5000k) illumination for color assessment unless you request otherwise. This excludes backlit trans, which use an industry standard of cool-white.
  • The best prints come from the best digital files. No amount of profiling will accurately compensate for poor exposure, over-worked corrections or inaccurate color. Profiles merely help with attaining a print that is truer to the actual content of the file. We strongly recommend using a properly calibrated display with the correct working space/output profile combination for a given printer or device. If you want to learn more: Color calibration information is available by clicking here.

Turnaround

  • All instructions must be written legibly, verbal instructions will not be exclusively accepted. When supplying a file for output, job turn around times begin on the first business day when we have received all required elements to complete the job.
  •  Compress (zip archive) your fonts if you are uploading your files, or convert your text to outlines.

Please include:

  • All screen and printer fonts
  • Linked files
  • A hard copy layout with a color reference if applicable. For uploaded files, please include a client approved PDF.
  • Provide images in the proper color space as listed for each device.
  • Lightjet – converted to our output profile, or in a working space such as Adobe 1998 or sRGB
  • Failure to properly set-up and include all necessary files MAY DELAY YOUR JOB! Any production time required to correct set-up errors, improper color-space, incorrect file type, proportions etc, may result in intervention charges billed at a $60 set-up fee, plus applicable hourly rates. All output pricing is based on the size required to print all data in your layout, including crop-marks, registration marks and bleed. Because we use a multi-platform network, it is imperative that file names be fully cross-platform compatible; no punctuation or extended characters such as bullets, trademark, slashes, dollar signs, commas, etc. Hyphens and underscores are acceptable.

Programs

Our Fuji-Frontier Mini-lab only accepts .jpg and .tif RGB files (sRGB is preferred for the most predictable color). Layout files and or PDF are not printable on this device. Please convert your files to .jpg or .tif before submitting for small format printing.

For large format printing, we accept files from the most current versions of the most popular professional graphics and layout programs listed below. If you are using a different program for your work please give us a call.

Adobe In-Design

  • .native, .eps, .pdf
  • RGB preferred
  • Please convert all text to outlines
  • All screen and printer fonts
  • Linked files
  • A hard copy layout with a color reference if applicable. For uploaded files, please include a client approved PDF.
  • Provide images in the proper color space as listed for each device.
  • Whenever possible, prepare your layout to final size of output.
  • If full size is not an option, please use a scaling of 50% or 25% .
  • If bleed is not included within the document area then it will not be printed.
  • If there is no bleed included, we will usually enlarge the print slightly to accommodate mounting.
  • Please inform us of the final document print size, so the job is not delayed while we contact you for that information.

Adobe Illustrator

  • .native, .eps, .pdf
  • RGB preferred
  • Please convert all text to outlines
  • All screen and printer fonts
  • Linked files
  • A hard copy layout with a color reference if applicable. For uploaded files, please include a client approved PDF.
  • Provide images in the proper color space as listed for each device.
  • Whenever possible, prepare your layout to final size of output.
  • If full size is not an option, please use a scaling of 50% or 25% .
  • If bleed is not included within the document area then it will not be printed.
  • If there is no bleed included, we will usually enlarge the print slightly to accommodate mounting.
  • Please inform us of the final document print size, so the job is not delayed while we contact you for that information.

Adobe Photoshop

  • Flattened, uncompressed tiff or max quality jpg.
  • Adobe 1998 or sRGB.
  • We reccomend converting to our profiles when applicable
  • Provide images in the proper color space as listed for each device.

Microsoft PowerPoint

QuarkXPress

  • .native, .eps, .pdf
  • RGB preferred
  • Please convert all text to outlines
  • All screen and printer fonts
  • Linked files
  • A hard copy layout with a color reference if applicable. For uploaded files, please include a client approved PDF.
  • Provide images in the proper color space as listed for each device.
  • Whenever possible, prepare your layout to final size of output.
  • If full size is not an option, please use a scaling of 50% or 25% .
  • If bleed is not included within the document area then it will not be printed.
  • If there is no bleed included, we will usually enlarge the print slightly to accommodate mounting.
  • Please inform us of the final document print size, so the job is not delayed while we contact you for that information.

Fonts

  • All screen fonts and printer fonts must be included or text converted to outlines.
  • DO NOT use keyboard commands for bold or italic fonts.
  • Use actual bold or italic fonts where applicable.

Layout

  • Whenever possible, prepare your layout to final size of output.
  • If full size is not an option, please use a scaling of 50% or 25% .
  • If bleed is not included within the document area then it will not be printed.
  • If there is no bleed included, we will usually enlarge the print slightly to accommodate mounting.
  • Please inform us of the final document print size, so the job is not delayed while we contact you for that information.

Color

  • All efforts will be made to approximate to your supplied color samples, however, due to the limitations of the different media, we cannot guarantee an exact match.
  • Color corrections that require more than global corrections will incur retouching charges. Items that we scan may require billable retouching time to match an original.
  • If a test must be approved before finals are hit, the finals will have normal turn around times, beginning from the time of approval for color.
  • If Pantone or process color matches are requested, we recommend calling so we can give you the closest equivalent color build for a given media.
  • All devices print differently, and different media on the same device may not produce the same results. An image corrected for one media may require additional retouching time to correct the image for another media.
  • Images supplied by the customer will be charged computer time to match color to a proof.
  • Remember, what you see on your monitor for color is not always a good indication of how the final print will look.

Proofs

  • If a proof is required, it will be done on the same device and media as the final print.
  • The proof will be the full image, printed to an 8″x10″.
  • If a strip test is requested at final size, there will be an additional charge applied.
  • If you require a proof after layout adjustments ie: text changes, image placement etc., we can email a PDF. If the files exceed 50 megabytes, we may print a screen capture of the layout. We will e-mail a PDF or screen capture free of charge.

Removable Media

We accept the following removable media:

  • CD-ROM/ DVD
  • Thumbdrive
  • Micro storage cards
  • You may also send you files via our web upload page.

LightJet – large format photo prints

LightJet Calibration Specifications and Profiles are available by clicking here.
Files submitted for LightJet output must be supplied:

  • In an RGB color-space
  • As non-compressed, flattened tiffs or maximum quality jpeg – no layered files.
  • Use of our profiles is highly recommended but not required.
  • At a minimum resolution of 150 ppi at 100% of final size.
  • For prints smaller than 20×24 it is recommended that the resolution of the file be closer to, but not to exceed 300 ppi. and rely less on the LightJet’s superior built-in interpolation.
  • The LightJet’s maximum resolution in normal mode is 300 dpi. For large prints from lower resolution files, we rely on the lightjet’s internal interpolation algorithms to achieve that final resolution.

Giclee Pigment on Canvas and Watercolor

  • The Pigment printers will print up to a 60 x 120 inch image area on a maximum paper size of 60 inches wide.
  • Watercolor paper or canvas,
  • Raster Images should be supplied at a minimum resolution of 200 ppi at 100% of output size as RGB TIFF- Adobe 1998 or sRGB.

Fuji Frontier Mini Printer for prints up to 12×18

The Fuji Frontier Digital Photo Printing Minilab accepts files in the following formats:

  • sRGB 8-Bit Tiff (no LZW)
  • sRGB 8-Bit Jpeg
  • Greyscale 8-Bit Tiff (no LZW)
  • Greyscale 8-Bit Jpeg
  • File names must have the appropriate .tif or .jpg extension and must not contain characters such as: \ / :*?”|’~ $ spaces right before the period, bullets or foreign characters.

Are Your Photos Ready to Survive Wildfires and Severe Weather?

I read a newspaper article in the Denver Post about the wildfire in BoulderHouse fully engulfed in flames Canyon, Colorado and the tragic losses the families there are suffering. The primary focus of this article concerns a couple, Barry and Kate, who lost their home once before to wildfires and may have just lost it for a second time to this fire. Kate is quoted as saying that as they fled this time they packed their ski gear, bikes and photographs. “The main thing is we got our photographs, because those can never be replaced” says Kate.

On their way out of the burning canyon, they stopped to help an elderly neighbor; Erna Means. What do you think Erna grabbed as she abandoned her house to possible total destruction? You got it, a box of photographs! Isn’t that what you hear all the time when someone asks what you would rescue as you’re running out of a house that is burning, flooding or being blown away? Photographs are always on the top of the list right after pets. That’s wonderful that people are so protective of their memories, that they feel photographs are irreplaceable, while everything else can be replaced.

If only people would be that concerned when a tragedy isn’t about to strike. You don’t hear about all the important images and memories that are lost forever, every day throughout the world when hard drives fail or CDs and thumb-drives become unreadable or cell phones and computers are lost or stolen. Anguished screams happen all the time. But it’s just not news worthy or important enough, until it happens to you or me. Backing up or archiving your memories is so easy to do but also so easy to forget and maybe a little time consuming, but oh so important. Check out my previous blogs titled “Digital Image Archiving – The Lost Generation parts 1 and 2” for ways you can protect yourself from the most probable cause of image loss, computer failure and advancements in technology.

Beautify Your Photographs While Making a Great First Impression

We were recently introduced to a new type of laminate for photographs, ink jet and poster prints we call “Crystal” for its faceted like surface. This is very different than a normal gloss or lustre coating. Being 5 ML thick with full UV protection, this laminate is extremely durable. We put it to the test for over 2 months and found it to be one of the toughest cold mount poly laminates we have seen. Our test clients loved it immediately and all but demanded we add it to our lineup of products. No doubt about it, the blacks are much richer, colors have more pop and the image has more depth and clarity. We first started offering this product strictly on our Gallery Mounts because it is tough enough to go through our edging machine and not show any scuffs or damage.

Now, we have make it available for any print mounted to any type of substrate. Fine art prints from wildlife and scenic’s to abstracts and commercial prints never looked richer or have had better protection. Check out our samples at the lab or if you are out of town just call us to have one sent out to you. My personal recommendation for an incredible eye catching, heart stopping, WOW kind of print is to put this laminate on Kodak Metallic paper. Although it also looks great on Fuji Crystal Archive C print paper and Fuji Flex, the Metallic is killer.

How to Get Great Color, Save Profits, and Never Have to Work Color or Density in Photoshop or Lightroom. Part 1

I’m going to fill you in on the secrets of how to get great color, save your
profits, and never have to work color or density in Photoshop. All without
the use of ICC profiles, confusing work-flows or batch conversions.
If you understood the above and it applies to you, chances are you are a
professional photographer. Professional print quality is much easier to achieve
than most photographers are aware.

Getting there requires Five crucial elements. With these five in place, you can go
directly from camera to print and get excellent results.

Yes, that’s right, higher profits and more free time with:
No Photoshop work.
No profiling magic.
No bag of tricks or fairy dust.

Rule #1 – If you have to adjust the density of your files, your metering is inaccurate.
You may find this hard to believe, but truly consistent spot-on exposures rarely come
from TTL metering. I know that’s tough to swallow, but reflective metering is just too fallible.

Don’t believe me? Here is a simple test to see if this rule applies to you.
1. Take a look at the average corrections you are making on your files in
Photoshop or Lightroom.
2. Jot down the number of exposure corrections you make in a work week.
3. If the answer is any higher than zero, guess what, I’m right – your TTL has failed you. So how do we correct this?
Get a GOOD new or used hand held incident flash meter, and calibrate it to your
camera using Will Crockett’s “Face mask Histogram Technique” copy and paste
the following web address into your browser: Go to
http://www.shootsmarter.com/index.php?option=com_content&task=view&id=116&acat=16
Keep in mind that digital cameras have only 1/8th stop of exposure latitude. If you
have an incident meter, compare it against Will’s meter reviews and see how it rates. Some
well known meters are unprofessionally inconsistent . Up to a horrible deviation of +- 1/3 stop from reading to reading. This is definitely outside of the acceptable range for a professional photographer and enough to put you back in an editing app to tweak density.

After you have calibrated your meter to your camera using the Face Mask Histogram, you have completed the first of a few simple steps towards a more efficient and predictable workflow. Take some test shots this week and fine tune your exposure calibrations to ensure you are keeping your highlight detail while maintaining good shadow detail.
Next time:
Part 2.

How to get Great Color, Save Your Profits, and Never Have to Work Color or Density in Photoshop. Part 2

My last blog post discussed the weakness of TTL metering and the need for spot on exposure to avoid working your files in photoshop. Thus saving money and time which should result in a more profitable business.

Rule #2 – If you don’t have proper white balance, you don’t have correct color.
This seems like a real “DUH!” statement, but it is astonishing how many pro’s still don’t grasp the importance of this.
Using auto white balance in a high-end professional workflow is a bad idea? Auto WB works if you have absolute
neutrals in your image, and even then it can be fooled by bright or near neutral tones in your subjects. If you are not getting consistent skin tones from sitting to sitting, or indoor to outdoor it’s time to adopt custom WB in your capture work-flow. And you wouldn’t dream of passing these auto white balance inconsistencies on to your final client prints – right?
The brief amount of time it takes to get an accurate custom white balance by using an accurate target can, and likely will, save your studio hours of Photoshop time.
And I am sure you know that in a pro studio:
Hours = (Profit – Dollars + extra time you could be getting more business).
And if you are paying staff to deal with exposure and white balance issues, don’t forget to add in payroll taxes and benefits to that equation. With accurate white balance control, you will NOT need to adjust the color of your files. Assuming of course that your camera is in a good state of repair. It is rare that the preset white balances on your camera will be accurate enough for professional standards.

To get an accurate WB, you need an accurate target.
If you are using a Kodak Grey card or one of those black/white/gray targets or a plastic over-the-lens diffuser, I would invite you to upgrade to something more accurate. If quality and/or profit margin are your #1 concerns; above all else get the most accurate WB target available. The Balance Smarter from the smart folks at BalanceSmarter.com.
Your color is only as good as the WB target you use. If you skimp here, you’ll pay the price later in additional work or reprints. Is it worth the risk?. After spending thousands on education, good gear and marketing to get business, seems a shame to put the investment and your reputation all on the line using a cheapo calibration target or tool.

If you are still tempted to take shortcuts during the shoot, every time you have the thought ” I’ll just fix it in Photoshop later”, say to yourself instead:
” I’ll just spend the time and money to fix it in Photoshop later”
Be Honest, isn’t the latter REALLY what you would be doing?

Next week:
Rule #3 – Using the right colorspace = great prints!