How Colors are Created in the Digital World

This short basics post will prime you to understand how colors are specified in digital files. In the reproduction market, of which Reed Art & Imaging is a part of, we use digitally driven devices to make faithful reproductions of original art, photographic captures and digital graphic designs. To accomplish this task with any hopes of repeatable accuracy, there must exist a standard system by which colors can be recorded, transferred, translated and output. These standards exist in theoretical color models. These models are a virtual shape, such as a box, sphere. polygon or other shape that if it were real, would contain every color visible to the human eye.

By SharkD (Own work) [GFDL (http://www.gnu.org/copyleft/fdl.html) or CC-BY-SA-3.0-2.5-2.0-1.0 (http://creativecommons.org/licenses/by-sa/3.0)], via Wikimedia Commons

The RGB color model mapped to a cube. The horizontal x-axis as red values increasing to the left, y-axis as blue increasing to the lower right and the vertical z-axis as green increasing towards the top. The origin, black, is the vertex hidden from view.

Because the model is represented by a shape, they are referred to color “spaces”, for the space the object would occupy in the theoretical environment of all colors – visible and invisible. The graphic above is an example of a space that uses Red, Green, and Blue to yield the final color we want to create.

Colors come to our eyes in two ways – or transmitted from a light source or reflected off of a surface.

RGB is called the “primary” space and it’s numerical system can be equated to the brightness values of transmitted light – or how intense the Red light, Green light, and Blue light are shining. As the numeric value increases, the lights get brighter and the closer to white they become. More on that in a bit.

In a CMYK model (the secondary space) we are representing pigments that absorb light. So as the number increases in their scale, the more light is absorbed. So with CMYK, the higher the number, the darker the color appears – exactly opposite of RGB.

In either space, the ratio of how the colors are blended determines the color, while numeric values contribute to how bright or dark it is.

For simplicity, the rest of this article will use only one color model. I’ll use the RGB model for these examples because it’s the model that our clients use and best supports high-end reproduction digital printing.

How Color is Expressed

Color is usually expressed in human terms by it’s

  • Value (light to dark)
  • Saturation (how close to pure is it)
  • Hue (red, purple, green, yellow, orange, etc.)

In the data driven world, it’s expressed as a recipe of the colors required to build its final value, saturation and hue. Image and graphics applications usually use the standard scale of 0-255 ( what is called 8-bit color) to represent the amount of each color present, with 0 being none and 255 being maximum. Dark colors being closer to 0 and light colors being closer to 255. Equal amounts of each color create neutral hues ( grays ) and as the numbers increase from 0 to 255 the value moves from black to white.
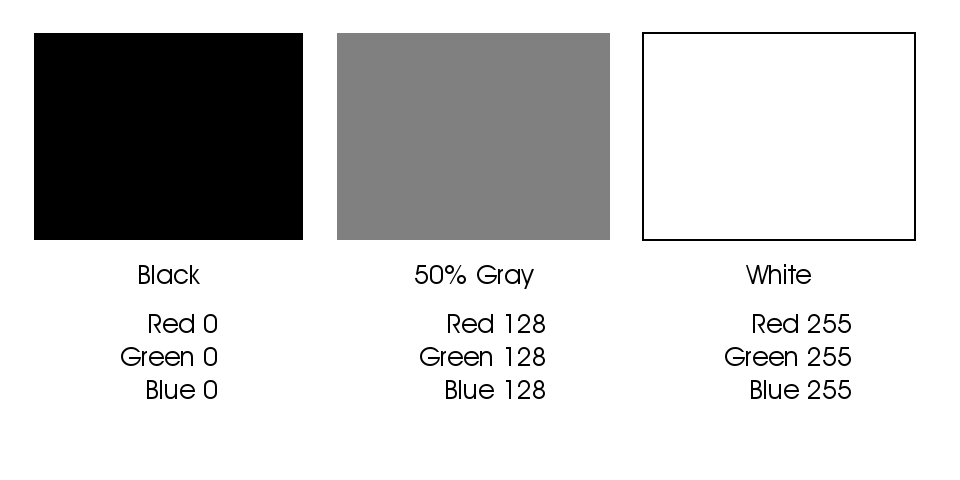
Darker values are closer to zero and lighter values are closer to 255

Darker values are closer to zero and lighter values are closer to 255


These numbers from 0 to 255 are called “Levels” and in our examples fall into a model of 256 levels – with zero being included as a level.  In an RGB color space, each color is built using various levels, or recipes, of Red, Green and Blue.  Dark Red has a different recipe than Light Red, and the recipes are different for a saturated versus less saturated red.
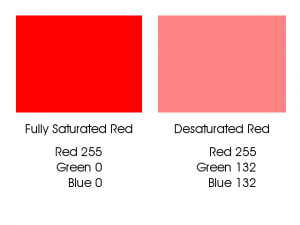
Fully saturated red is a different build than a less saturated red.
Fully saturated red is a different build than a less saturated red.

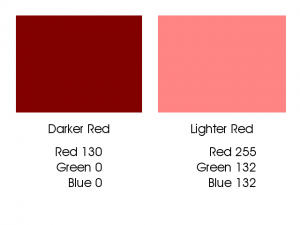
Dark Red has a different build than Light Red.

Dark Red has a different build than Light Red.


As you can see in the first example above, a fully saturated hue has 255 of it’s requisite colors and none of the other colors. As the color desaturates, it gains some of the other colors; it’s moving closer to a neutral gray.  In the second example we can see that the Darker Red contains none of the other colors, but the Red number is dropping closer to zero; thus making it “blacker.” This darker red is as saturated as it can get at this present value.

A critical point to understand is that in an RGB or CMYK file, color and density are inter-connected. Meaning that any change you make to color data will result in changes to density and visa-versa.


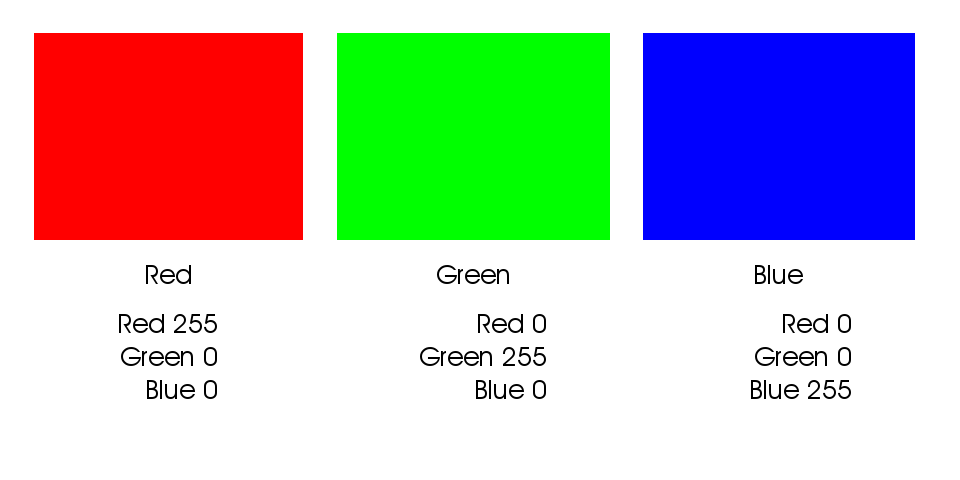
The other primary colors are built in the same way, like this:
Color builds of fully saturated Red, Green and Blue.

Color builds of fully saturated Red, Green and Blue.


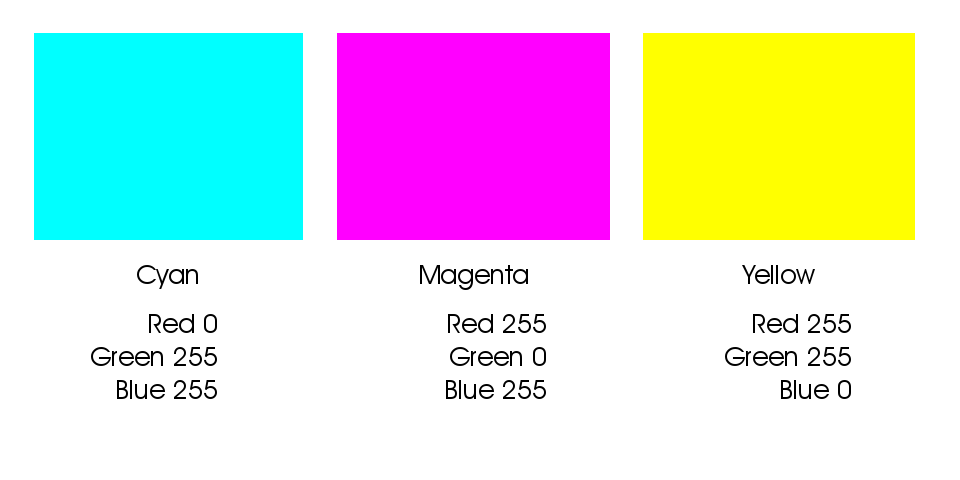
The secondary colors are built from equal amounts of two of the three colors:
Graphical representation of the secondary color recipes

Secondary colors are built from two of the three colors

These secondary colors are thought to be the “opposite” colors to those in the previous example. You will notice their recipes are directly inverse. Red is R255 G0 B0 and Cyan is R0 G255 B255.  They are opposites because when the two colors are combined, they cancel each other out and make gray.  Equal parts of Red and Cyan make gray, same goes for Green with Magenta, and Blue with Yellow.

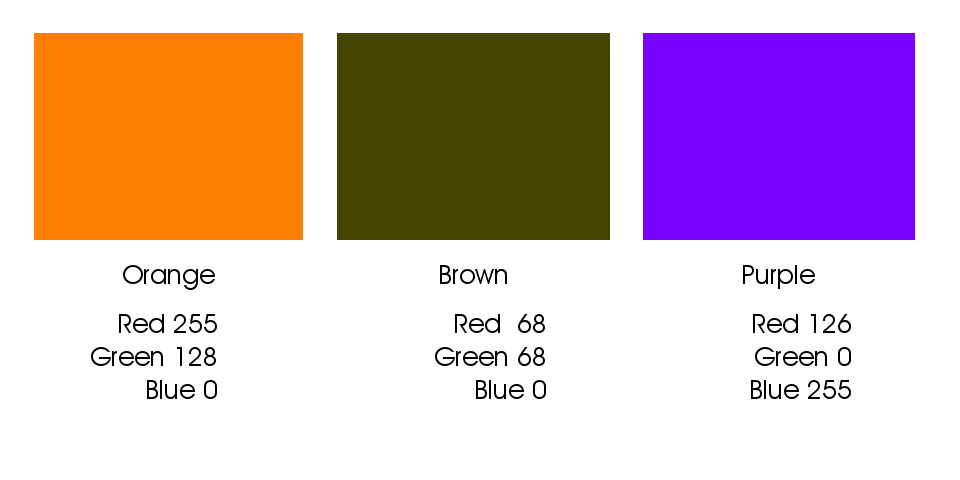
Intermediate colors such as Orange, Brown, Purple, Daisy Yellow, Lemon Yellow etc. are built by using various values of the three colors where at least one of the colors is greater than 0 and less than 255:
Intermediate color builds

Intermediate colors result from builds using two or more colors.


This 8-bit model, using it’s 256 level per color channel architecture allows for approx 16.7 million variants of color and density.  (256 x 256 x 256 = 16,777,216).

Other bit-depths exist that extend the number of available colors; the concepts are the same, but the numbers differ.

For example: 12-bit color – the depth that most digital cameras record in raw format, has 1,728 levels per color channel (instead of 256) with a total number of 5,159,780,352 available colors, much higher than present technology can reproduce in a print or display.  The commonly used 16-bit depth has 4,096 levels per color channel with a total number of 68,719,476,736 available colors – yes that’s 68.7 Billion!  While some professional pigment printers and their RIPs can support a 16-bit file, getting the subtleties from that many colors on paper and dots via a limiting 8 to 12 different ink colors is still problematic.

If you have questions, post them in the comments below.  If you want to see how this all ties together with Photoshop channels, stay tuned, that’s next!
 

Megapixels Aren’t the Only Factor to Consider When Buying a Camera

megapixSome questions from our clients and our readers seem to come up more often than others. Many of those questions center around the importance of Mega-pixels. This question came across my desk this morning and since it’s often relevant to our readers, I am sharing my response with you.


“When customers order larger photographs from the lab…let’s say using the Kodak Metallic Print paper…is anyone able to tell me how many pixels their cameras usually use or how does one figure this out?…I am thinking about upgrading my Camera and would like the ability to offer larger prints without losing quality.  I know that some of the new cameras offer more pixals some offer 20 etc.  However, is that what I truly want to look at?”

The good news is that you are asking the good questions. The flip-side is that this is opening a door to a warehouse full of more questions.

Yes, megapixels are an important factor to the end result. It is only one factor however.  Megapixels are top of mind for everyone because the camera manufacturers need “features” they can market with.  They are looking for ways to set their product apart from the others, and this stat is one that is easily digestible to the consumer. We tend to like easy comparisons, and anything with a number fits that bill nicely. Unfortunately, the marketers rarely tell you the benefits of the various features and leave it up to you to infer them.

Here is a short list of what are often considered the primary stats to consider:

  • Chip Resolution (megapixels)
  • Raw file capabilities ( shooting in raw provides greater editing flexibility after the shoot)
  • Max ISO ( high ISO with low noise is generally considered favorable)
  • Dynamic Range ( The ability to capture shadow detail and highlights in the same shot)

There are other considerations that are often driven by an individuals needs.

  • Price
  • Video capable (frame rate and resolution are important factors for video quality)
  • Max burst rate ( more frames per second is important to action shooters who will shoot in bursts to try to get the perfect shot – think sports photography)
  • Auto bracketing ( Auto brackets help you get maximum dynamic range if the scene’s range is greater than the camera can capture in a single shot)
  • Auto HDR ( takes a bracket and automatically merges them for highlight and shadow detail)
  • zoom level if it’s fixed lens (The higher the X number the more zoom range from wide to telephoto)
  • auto focus speed ( important when you are shooting moving objects or if shot timing is critical)
  • max f/stop – again if it’s fixed lens ( f/2 lets in more light than f/3.5 and thus allows for faster shutter speeds)
  • included software ( some cameras come with specialized software – usually consumer grade software)
  • form factor ( How big, how heavy, what’s the shape and color, etc.  Will you carry it in a pocket or purse? Around your neck? etc)
  • tethered shooting ( remotely controlling your camera from a laptop, tablet or smartphone allows for instant downloads of the captured image to your device for enlarged viewing and fast editing)
  • position and accessibility of controls ( how fast can you get to often used controls such as shutter speed, aperture, white balance, and any settings that are important to you. Also are you likely to accidental bump something during casual use and handling)
  • bells and whistles ( fancy stuff like shooting in sepia or black and white, special effects, built-in timers for time-lapse, etc.)

Since your question was in regards to image quality in relation to enlargement, I’ll focus comments there.

There are several generally accepted aspects to image quality:

  • Pixel dimensions (megapixels = file resolution H x W)
  • Image resolution (actual sharpness – it’s a combined result of lens sharpness and pixel resolution)
  • Color fidelity ( color accuracy for every pixel – this affects how true-to-life the image is)
  • Noise level ( less noise is generally considered ideal – noise looks like film grain)
  • Compression artifacts ( these are generally considered detrimental as they destroy color fidelity and detail – to avoid these you will need a camera that shoots RAW or TIFF in addition to the usual JPEG)
  • Tonal range (contrast and detail without clipping to pure black or pure white – the ability to capture shadow detail and highlights at the same time)

All of the items are important to quality, but items in bold are specific to how big the image will reasonably print before the quality drops to unacceptable.   While pixel count is certainly important, equally, if not more important is lens quality. Pixels are not a representation of sharpness, but of resolution. While the two are inter-twined, sharpness is in my opinion a bigger factor.  We have printed many files that had low pixel count but were shot with really nice lenses. The results are better than a high pixel count file shot with inferior lenses.  A not so good 24MP file will not print as well as a good sharp high quality file from an 18MP file scaled up to 24MP  If your budget demands picking either good glass or high mega-pixels, I would suggest you go with the better glass – you’ll get a better return on your investment. Stats and specs can be misleading, so use them as general guide, not as gospel and remember, more is not always better. Especially if you are giving up something more important to get the “more”.

Noise level varies from model to model and is a result of the quality of the chip, the amount of light falling on the chip and the quality of the camera’s internal computer and it’s software.  It can also come from the software you use on your computer to process your RAW files. Part of the cost of a pro-level camera is to pay for the high-end and high-speed processors and CCD chips used in the body.

Most in-camera file compression is destructive and at varying degrees. In my opinion, JPEG is not the ideal file format if detail in the print is of paramount consideration. The compresson process throws away critical detail and is very damaging to the color fidelity. If you pay for a 24MP camera and shoot jpeg, you may only get 12-18MP worth of real detail and around 6MP of color fidelity.  You can learn more about RAW versus JPEG in a previous post here.
When choosing a new camera, make a thorough list that covers what kinds of shooting you do and what features and controls you use for that style. Use that list to determine your must haves as well as any features that would just be nice to have.  Here is an example such a list:

Portraits:

  • Top Shutter speed
  • Aperture priority
  • flash sync
  • white balance
  • interchangeable lenses
  • high ISO
  • Tripod mount
  • Vibration reduction for hand held shooting
  • Jpeg and raw in single capture

Landscapes:

  • Top Shutter speed
  • Aperture priority
  • flash sync
  • white balance
  • interchangeable lenses
  • Tripod mount
  • Bracketing
  • Tilt-able view screen for low angle shooting

Studio:

  • Top Shutter speed
  • Aperture priority
  • flash sync
  • white balance
  • interchangeable lenses
  • high ISO
  • Tripod mount
  • Vibration reduction for hand held shooting
  • Tethered shooting
  • Jpeg and raw in single capture

Nice-to-haves:

  • Large megapixels
  • Full-frame sensor
  • Uses my existing lenses
  • Large view screen
  • Lightweight
  • Accepts accessory grip with additional battery
Now distill this down to one list to remove the duplicates, refine the details then put them in order of priority for you:
  1. Interchangeable lenses
  2. Uses my existing lenses
  3. High megapixels
  4. Full-frame sensor
  5. Top shutter speed 1/5000 or better
  6. Aperture priority
  7. flash sync
  8. white balance
  9. Tripod mount
  10. high ISO
  11. Bracketing
  12. Large view screen
  13. Tilt-able view screen for low angle shooting
  14. Jpeg and raw in single capture
  15. Tethered shooting
  16. Lightweight
  17. Vibration reduction for hand held shooting
  18. Accepts accessory grip with additional battery
With list in hand, the internet or a good camera store should be your next destination for finding models that fit your needs. Nothing beats a well informed and experienced camera sales-person. If you have your list, they can often point you to a few selections in a matter of minutes. It might cost a small amount extra to buy in the store, but the time and frustrations you save instead of doing the search yourself can be worth it.
In the comments below, share what your priorities are and your methods for picking the ideal camera or other tools in your arsenal.  I’ll send the first five helpful responders a nice gift.

Giclee Fine Art Printing – Getting a Great Print Part 1 – Photography of Artwork

A Pigment print is a bit more than just an inkjet print. So what makes it fine art worthy? To qualify, the print must be achieved using archival grade pigmented inks on archival grade fine-art paper or canvas. While we love the look of the watercolor papers and canvas papers we don’t suggest using Giclee “photo papers”. For aesthetic reasons, we recommend that the artist get a fine art photographic print for that. But the quality of the fine art pigment print is not limited to the inks and papers you use. There is quite a bit more that goes into the craftsmanship than just the print alone.

There is a great many details that should be tended to, but the major areas can be broken down like this:

Photography of your artwork
Working the file before testing
Generating a worthy test print
Working the file again to refine the proof
Printing the final units or series

Each of these is important to understand so they may become an effective part of your workflow. Since there is a great deal of information to pass along,  I’ll split the content into a multi-part series.

Photography of art work

Every step in the production chain of your fine art edition is critical, but some steps, if improperly done, can be disastrous to the final viewer experience. The first step, photography of your artwork, is an excellent example. This step is the largest determining factor to the faithful reproduction of your original art. To create a great pigment print, the photography of the artwork should be:

  • Focused properly using high-end lenses
  • shot using a strudy tripod in a vibration free environment
  • photographed using the sweet-spot of the lens
  • in some cases, polarized light and or special lens filters may be required
  • exposed correctly with a critical attention to detail
  • evenly lit using the proper lights
  • correctly white balanced
  • shot in the proper file format and with sufficient resolution
  • shot in a colorspace that is large enough to capture the full range of the painting and supports the full range of the Pigment print

The right glass

Shooting with inferior lenses may result in various distortions, such as smearing around the edges, chromatic aberrations – where some colors focus differently than others, barrel or pin-cushion distortion, lens flares and overall lack of saturation and/or contrast.  Shooting with prime lenses and pro-level equipment will provide the highest possible image integrity and result in a file that achieves the closest honesty to the original.

Image courtesy of https://upload.wikimedia.org/wikipedia/commons/thumb/4/47/Lens6a.svg/200px-Lens6a.svg.png

Chromatic aberrations of cheaper lenses result in out of focus images with color fringing.

Image courtesy of https://upload.wikimedia.org/wikipedia/commons/thumb/9/91/Apochromat.svg/200px-Apochromat.svg.png

Proper apo-chromatic focus results in all wavelengths (colors) focusing on the same plane for maximum sharpness and detail.


Image courtesy of https://upload.wikimedia.org/wikipedia/commons/6/66/Chromatic_aberration_%28comparison%29.jpg

Bottom photo clearly shows effect of apo-chromatic aberrations.

Distortions, or bending of the image are another issue with lesser quality lenses with “pincushion” and “barrel” being the most common. Pincushion distortion has the effect of the center of the image being further away than the edges while barrel distortion is just the opposite. With barrel distortion, the center of the image appears closer to the viewer than the edges.

Image courtesy of https://upload.wikimedia.org/wikipedia/commons/thumb/5/5b/Pincushion_distortion.svg/200px-Pincushion_distortion.svg.png

Pincushion distortion created converging lines towards the center of the image

Image courtesy of https://upload.wikimedia.org/wikipedia/commons/thumb/6/63/Barrel_distortion.svg/200px-Barrel_distortion.svg.png

Barrel distortion creates diverging line near the center of the image


A quality image capture is not dependent exclusively on a good camera/lens combination.

A high quality pro level tripod is a must for the artist who is serious about photography of art

A high quality pro level tripod is a must for the artist who is serious about photography of art, and they are expensive.

All elements in the photographic process are important. For example: how the camera and art work are handled during the exposure process will add a measurable difference to the final product.

A good solid vibration free tripod is a must-have if you are serious about photographing your own work.  Any vibration in the camera or the original artwork during exposure will result in “motion-blur” that will visibly carry over to your reproduction prints. While lesser tripods may be appealing just because of their price, they are susceptible to vibration, “ringing”, sagging and slipping during exposure. Think of it this way, if cheapo gear would lead to professional results, then why would there be a need for “pro” gear, and why would the pros invest the top grade gear?

If you want to get the best looking print, and your are committed to doing your own photography of your art do yourself and your art buyers a big favor and use the gear that will get you fine art quality instead of drugstore quality.

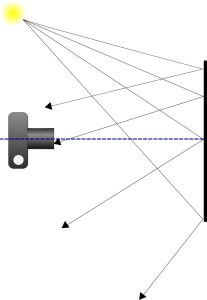
A stable support for your artwork is equally important. Any movement in your art during exposure will result in motion blur issues that will leave the image looking out of focus or double-exposed. While it may be tempting to take your art outdoors for the photo session, keep in mind that your painting is much like a sail in the wind. The slightest breeze will result in movement in the artwork. Heavier breezes or gusts may damage your art. And shooting with only one light-source, such as the sun, does not provide even lighting across the entire painting. I know this sounds crazy, but it has to do with what is called “angle of reflection” This is basically a measurement of the angle the light-path takes as it reflects away from the subject towards the viewer or camera and it is always equal to the angle of incidence (the angle the light path takes to get to the subject).

The propensity of light falling on a subject will reflect away at an angle equal to that of it's source.

The propensity of light falling on a subject will reflect away at an angle equal to that of it’s source.

Light falling on your canvas is more likely to scatter in a direction away from the light source. So let’s take the example to the right. The light source, in this case the sun, is to the left of the painting and the camera is directly in front of it. As we move across the canvas from left to right, we have less light reflecting in the direction of the camera lens. This results in the right side appearing darker than the left. This is called “fall-off”. Our eyes and brains adjust for fall-off for us, so we tend not to see it with the naked eye. While much of the light will “scatter” off in multitudes of directions, it is not enough to eliminate fall-off.

Since our light source is high and to the left of the subject, the brightest area will also be high and to the left.

Since our light source is high and to the left of the subject, the brightest area will also be high and to the left.


Shooting indoors gives you the greatest control over your environment for lighting and stability. When possible, setup your tripod on a concrete floor. Wood floors have flex and tend to amplify vibrations like a spring-board. If you must setup on a wooden floor, try to locate the load bearing supports under the floor and set your tripod in that area to minimize vibration. The farther you are away from the supports, the more amplified the vibrations.

Stay tuned for the next post in the series on Proper Lighting and Exposure. You can subscribe to our newsletter or via RSS to be notified automatically.