Giclee Fine Art Printing – Getting a Great Print Part 1 – Photography of Artwork

A Pigment print is a bit more than just an inkjet print. So what makes it fine art worthy? To qualify, the print must be achieved using archival grade pigmented inks on archival grade fine-art paper or canvas. While we love the look of the watercolor papers and canvas papers we don’t suggest using Giclee “photo papers”. For aesthetic reasons, we recommend that the artist get a fine art photographic print for that. But the quality of the fine art pigment print is not limited to the inks and papers you use. There is quite a bit more that goes into the craftsmanship than just the print alone.

There is a great many details that should be tended to, but the major areas can be broken down like this:

Photography of your artwork
Working the file before testing
Generating a worthy test print
Working the file again to refine the proof
Printing the final units or series

Each of these is important to understand so they may become an effective part of your workflow. Since there is a great deal of information to pass along,  I’ll split the content into a multi-part series.

Photography of art work

Every step in the production chain of your fine art edition is critical, but some steps, if improperly done, can be disastrous to the final viewer experience. The first step, photography of your artwork, is an excellent example. This step is the largest determining factor to the faithful reproduction of your original art. To create a great pigment print, the photography of the artwork should be:

  • Focused properly using high-end lenses
  • shot using a strudy tripod in a vibration free environment
  • photographed using the sweet-spot of the lens
  • in some cases, polarized light and or special lens filters may be required
  • exposed correctly with a critical attention to detail
  • evenly lit using the proper lights
  • correctly white balanced
  • shot in the proper file format and with sufficient resolution
  • shot in a colorspace that is large enough to capture the full range of the painting and supports the full range of the Pigment print

The right glass

Shooting with inferior lenses may result in various distortions, such as smearing around the edges, chromatic aberrations – where some colors focus differently than others, barrel or pin-cushion distortion, lens flares and overall lack of saturation and/or contrast.  Shooting with prime lenses and pro-level equipment will provide the highest possible image integrity and result in a file that achieves the closest honesty to the original.

Image courtesy of https://upload.wikimedia.org/wikipedia/commons/thumb/4/47/Lens6a.svg/200px-Lens6a.svg.png

Chromatic aberrations of cheaper lenses result in out of focus images with color fringing.

Image courtesy of https://upload.wikimedia.org/wikipedia/commons/thumb/9/91/Apochromat.svg/200px-Apochromat.svg.png

Proper apo-chromatic focus results in all wavelengths (colors) focusing on the same plane for maximum sharpness and detail.


Image courtesy of https://upload.wikimedia.org/wikipedia/commons/6/66/Chromatic_aberration_%28comparison%29.jpg

Bottom photo clearly shows effect of apo-chromatic aberrations.

Distortions, or bending of the image are another issue with lesser quality lenses with “pincushion” and “barrel” being the most common. Pincushion distortion has the effect of the center of the image being further away than the edges while barrel distortion is just the opposite. With barrel distortion, the center of the image appears closer to the viewer than the edges.

Image courtesy of https://upload.wikimedia.org/wikipedia/commons/thumb/5/5b/Pincushion_distortion.svg/200px-Pincushion_distortion.svg.png

Pincushion distortion created converging lines towards the center of the image

Image courtesy of https://upload.wikimedia.org/wikipedia/commons/thumb/6/63/Barrel_distortion.svg/200px-Barrel_distortion.svg.png

Barrel distortion creates diverging line near the center of the image


A quality image capture is not dependent exclusively on a good camera/lens combination.

A high quality pro level tripod is a must for the artist who is serious about photography of art

A high quality pro level tripod is a must for the artist who is serious about photography of art, and they are expensive.

All elements in the photographic process are important. For example: how the camera and art work are handled during the exposure process will add a measurable difference to the final product.

A good solid vibration free tripod is a must-have if you are serious about photographing your own work.  Any vibration in the camera or the original artwork during exposure will result in “motion-blur” that will visibly carry over to your reproduction prints. While lesser tripods may be appealing just because of their price, they are susceptible to vibration, “ringing”, sagging and slipping during exposure. Think of it this way, if cheapo gear would lead to professional results, then why would there be a need for “pro” gear, and why would the pros invest the top grade gear?

If you want to get the best looking print, and your are committed to doing your own photography of your art do yourself and your art buyers a big favor and use the gear that will get you fine art quality instead of drugstore quality.

A stable support for your artwork is equally important. Any movement in your art during exposure will result in motion blur issues that will leave the image looking out of focus or double-exposed. While it may be tempting to take your art outdoors for the photo session, keep in mind that your painting is much like a sail in the wind. The slightest breeze will result in movement in the artwork. Heavier breezes or gusts may damage your art. And shooting with only one light-source, such as the sun, does not provide even lighting across the entire painting. I know this sounds crazy, but it has to do with what is called “angle of reflection” This is basically a measurement of the angle the light-path takes as it reflects away from the subject towards the viewer or camera and it is always equal to the angle of incidence (the angle the light path takes to get to the subject).
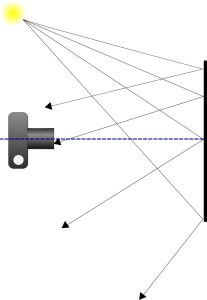
The propensity of light falling on a subject will reflect away at an angle equal to that of it's source.

The propensity of light falling on a subject will reflect away at an angle equal to that of it’s source.

Light falling on your canvas is more likely to scatter in a direction away from the light source. So let’s take the example to the right. The light source, in this case the sun, is to the left of the painting and the camera is directly in front of it. As we move across the canvas from left to right, we have less light reflecting in the direction of the camera lens. This results in the right side appearing darker than the left. This is called “fall-off”. Our eyes and brains adjust for fall-off for us, so we tend not to see it with the naked eye. While much of the light will “scatter” off in multitudes of directions, it is not enough to eliminate fall-off.

Since our light source is high and to the left of the subject, the brightest area will also be high and to the left.

Since our light source is high and to the left of the subject, the brightest area will also be high and to the left.


Shooting indoors gives you the greatest control over your environment for lighting and stability. When possible, setup your tripod on a concrete floor. Wood floors have flex and tend to amplify vibrations like a spring-board. If you must setup on a wooden floor, try to locate the load bearing supports under the floor and set your tripod in that area to minimize vibration. The farther you are away from the supports, the more amplified the vibrations.

Stay tuned for the next post in the series on Proper Lighting and Exposure. You can subscribe to our newsletter or via RSS to be notified automatically.


Getting the Best Possible Print from Your Fine Art Lab. Part 3 of 5

File optimizing and sweetening.

If done properly, this is an area in your work flow that can really make your image sing. Gross corrections in color and density should have been handled using Bibble as your raw converter. Fine tuning localized areas of the image such as burning and dodging can be handled in Photoshop or Gimp using curves with masks. For saturation adjustments, I prefer to use selective color over hue/sat, when I need to add more red to the reds, more blue to the blue, etc. I have found that using hue/sat is more likely to cause banding and other visible damage in the color channels.  Sharpening happens in several steps for me. First pass of sharpening happens in the raw conversion stage. I sharpen there, just enough to tighten up the pixels while avoiding halos and edge artifacts.  After sweetening the file in Photoshop or GIMP, I will scale a print ready file for output and sharpen according to the type of output. If I am just using unsharp mask, I prefer to sharpen using a high percentage – 400-500% with a low radius. 0.3-0.4 and a zero threshold. Else-wise, I will use a modified version of a hi-pass sharpening. I’ll cover that method in another post.

Once sharpened, I will convert to an output profile appropriate for the printer the file is to be imaged with. After this convert to profile step, I will carefully examine each of the three color channels for the presence of banding or other artifacts related to the profiling. If the artifacts are concerning to me, I will undo the convert to profile and print using the working color space. I ALWAYS test any file before printing large, and I recommend that others do the same if you are looking for the “best” print. Files submitted for printing in a large working space tend to need additional saturation – 12-18% for the first test. Then I will tweak the file a bit more based on the first test. If I had to make dramatic changes, then  a second test is warranted.

Share your thoughts and ideas by leaving a comment

Next from me: Getting closer to the final print: How much trust should you put in color profiles?

What “they” might not be telling you about the flaws in ICC profiled workflows.

Profiles are typically generated using less than .016% (yes that is less than 16/1000 of one percent!) or 16/100,000 of the 16.4 million colors available in 8bit RGB. Talk about a shot in the dark. There is a tremendous amount of mathematical software based “guessing” that occurs in the ICC color management process.

Profiles are 100% dependent on consistency. They only work if you have consistent input and consistent output. Lenses used in capture, accuracy of camera white-balance calibration, scanner calibration, conditions in process, paper, chemistry, ink, equipment condition, light sources, supply voltages, time of day, humidity, blah blah blah can all have an impact on product output or digital input. These conditions are all subject to change, and do change. Thus, profiles are at their most “accurate” for the moment the profile was created. As these conditions drift and change over time, they effect the “accuracy” of the profile. Many individuals in our industry have touted that profiles have an expectation of consistency. One that unfortunately just does not exist in real world conditions. Through equipment care and high levels of professional level calibrations we attempt to keep our input/output equipment “calibrated” to the same standards on which the profile is based. In theory, this causes the final output to float around the bull’s eye and stay close to the expected, rather than take a direct bee-line away from it and continually get further off-target.
A good lab will calibrate their devices back to factory standards several times during a production day.  This is done to compensate for process variables that occur over time, and changes in paper from batch to batch.
My goal here is to help you become aware that though profiles are often elevated to a high stature as an end all solution,  they really fit more into a false-god category.

Now this is not to say that profiles are useless. Far from it in fact. They can have a dramatic impact on overall color approximation across multiple devices. Such as getting your ink jet to approximate your file and to get our LightJets to approximate that very same file. In fact we use profiles in-house to get our LightJets to approximate the smaller sRGB color space of the Fuji Frontier prints. Due to the larger available gamut of the LightJet, it is more likely to get the LightJet to approximate the Frontier than the other way-round. And we use them in some profile dependent work flows such as our professional digital press, and our Durst Sigma scans. The software that drives these devices, will not function correctly without profiles in place. The truth is, most digital capture and print sotware have some sort of embedded profiling built in. Your digital camera for instance, needs to know the characteristics of the dyes used to filter the image sensor in order to deliver a density and color accurate file.
I believe that any NON-DESTRUCTIVE method of producing better color has the potential to be a good idea. I’ll again stress “NON-DESTRUCTIVE”.  I am a big proponent on avoiding color channel damage whenever possible.  The caveat to forcing a profile on an image is it’s potential for color channel damage. I have seen many files where the colors were pushed too close to 100% saturation prior to a profile conversion. The resulting breaks/banding is inevitably and incorrectly blamed on the profile.

The great thing about ICC profiles in your work flow is their potential to get you closer to your target. They are by no means any guarantee of a bull’s eye, an exact match, perfect color, or any other false promise you have heard or at this point still believe. I often use this analogy: “Profiles are like a ticket to a baseball game. They get us in the gate, and might just get us a good seat, but that ticket will never allow us to sit on home plate while the batter hits a homer. BUT, that good seat is still much better than listening to the game on the AM radio while sitting in the parking lot.”

So, better. It’s just not a guarantee.
Profiles, in a nutshell, describe the devices available boundary or gamut as well as the limitations or inaccuracies and should not ever be confused with or used as working color spaces. They are far too small for use as a working space and should be thought of something to move colors <to> not <within>. Banding/breaking/clipping will likely result if you should choose to ignore this. It is best practice to use a working space that is larger than the output space, then allow your profile conversion to remap to hold detail.

If you remember my remarks regarding consistency, these constant changes diminish profile accuracy.  So why do we make a profile available for our printers? Well, quite frankly, because in most cases, an perceived improvement in print quality will result from a proper color-managed workflow.

One exception to this is our Fuji Frontier. This device is specifically calibrated to work within the sRGB colorspace. It’s output gamut is limited of course by the capabilities of Fuji Crystal Archive paper, but this design will allow a photographer who is color-calibrated and working in sRGB to be free of output profiles. One less layer of potential damage to the file.
So how should you be using your profiles?

Let’s start with what NOT to do.

If I use profiles in an attempt to get one device to approximate the characteristics of another device, I am in essence, attempting to get device A to look like device B, and both devices inaccuracies will be included! This is a great example of Square Peg I A Round Hole. If the gamut (outside edges of the pegs) of device A do not match the gamut (profile outliers) of device B, loss will occur. Much like using a hammer to get that peg in – you’ll shave off some of the peg, and what is left does not completely fill the hole.

In fig.1 above, the LightJet Fuji Matte has the larger gamut.The darker looking cube inside that area is the gamut of the Epson Enhanced matte. The bit of gray peeking out at the bottom is the zone where the Epson’s gamut is a bit larger than the LightJet. The area labeled Profile Overlap represents the available colors that both devices share. So this would be the available gamut when trying to match one of the devices to the other. In other words, all of the areas outside the overlap would be lost. In my opinion, that is a pretty large chunk of color to toss away just for the gratification of getting two prints to look as close as possible to one-another.  In essence, we would be “dumbing-down” the quality of our final print.

Good profile methods will attempt to “re-map” or squeeze those outside colors to fit within the range of output (the square hole), but the missing colors (the corners) aren’t properly restored. This results in a sacrifice of color fidelity from the original file.

So if you still want to profile, this is how I approach ICC profiling for Maximum Color Fidelity. At least within the limits resulting from profiling.

Let’s assume that we have:

– A source file: test.jpg
– Ink jet printer A that lets say: prints Blues with too much Green,
– and I have printer B that prints Reds with too much Yellow.

So:
A) +Green cast in Blues = Damaged Color
B) +Yellow cast in Reds = Damaged Color
ICC Profiles = Attempted Damage Reversal (at least in theory anyway)

Example 1: Try to get Printer B to look like printer A with one profile – bad Idea

If I print test.jpg on B, trying to approximate A via A’s ICC Profile, I have a print that has the native issues of too much Yellow in the Reds, and because we told B to look like A, I also have too much Green in the Blues. Why would I want a print with both sets of issues?
Damaged Color + Damaged Color = MORE Damaged Color.

Example 2:  Try to get Printer B to look like printer A with two profiles – best idea for closest approximation between printers 

I print test.jpg using profiles for both printers. I tell my software to make B look like A, but use B’s profile too.
So now the output attempts to remove B’s issues, the Yellow cast from the Reds.
BUT, because I am still approximating printer A, I am still introducing the Green cast in the Blues. So now I have at least one printers issues in full glory.
Damaged Color + (Damaged Color + Attempted Damage Reversal) = Damaged Color. Still some loss, but I should have two prints that are fairly close.

Example 3:  Try to get Printers A and B to look like the source file – best idea for maximum fidelity to source file.

Rather than attempting to get A to approximate B, We print the file to each printer, avoiding an approximation between the printers.
Instead, we want to allow each printer to get as close to test.jpg as possible. So we print test.jpg to A with it’s profile and to B with it’s profile.
A) Damaged Color + Attempted Damage Reversal = Less Damage.
B) Damaged Color + Attempted Damage Reversal = Less Damage.

So rather than compounding issues or keeping some and removing some, in theory, both prints are now as close as they independently can be to the original contents of the test.jpg file.


TIP!

Nothing in nature is saturated to 100% of any given color. There will always be some absorption of wavelengths of all colors. So don’t push your files thinking the final product will still be believable or still hold detail. The closer to 100% you push the saturation, the closer to zero you push the detail. And please don’t blame your profiles for damaging a file that was pushed too far.  Perceptual profiling is just not designed to work with a lack of color fidelity and you just might be wasting your hard earned cash to get a print you don’t like.

If your preference is hyper-saturation, make sure to match image type to printer type. For example, if you like saturated yellows, you could be printing to a device that can actually reproduce the brilliance you are seeking. Giclee printers are a great example of this. Being an ink-jet, they are quite capable of reproducing intense yellow as this is one of the native ink colors on the device.The same holds true for the other two colors, Cyan and Magenta. When you add any two or more inks together to create a new color, you are adding density and reducing saturation. With the advent of the intermediate “photo” colors, some of the subtler in-between colors are now improved. On the LightJet, the Kodak Metallic paper holds more saturation than Fuji Crystal Archive, but the blacks are not as rich nor as neutral.

How to get great color, save your profits, and never have to work color or density in Photoshop. Part 1

I’m going to fill you in on the secrets of how to get great color, save your
profits, and never have to work color or density in Photoshop. All without
the use of ICC profiles, confusing work-flows or batch conversions.
If you understood the above and it applies to you, chances are you are a
professional photographer. Professional print quality is much easier to achieve
than most photographers are aware.
Getting there requires Five crucial elements. With these five in place, you can go
directly from camera to print and get excellent results.
Yes, that’s right, higher profits and more free time with:

  • No Photoshop work.
  • No profiling magic.
  • No bag of tricks or fairy dust.

Rule #1 – If you have to adjust the density of your files, your metering is
inaccurate.
You may find this hard to believe, but truly consistent exposures rarely come
from TTL metering. I know that’s tough to swallow, but reflective metering is just too fallible.
Don’t believe me? Here is a simple test to see if this rule applies to you.
1. Take a look at the average corrections you are making on your files in
Photoshop or Lightroom.
2. Jot down the number of exposure and color balance corrections you make
in a work week.
3. If the answer is any higher than zero, guess what, I’m right – your TTL has failed you. So how do we
correct this?
Get a GOOD new or used hand held incident flash meter, and calibrate it to your
camera using Will Crockett’s “Face mask Histogram Technique” copy and paste
the following web address into your browser: Go to
http://www.shootsmarter.com/index.php?option=com_content&task=view&id=116&acat=16
Keep in mind that digital cameras have only 1/8th stop of exposure latitude. If you
have an incident meter, compare it against Will’s meter reviews and see how it rates. Some
well known meters are unprofessionally inconsistent . Up to a horrible deviation of +- 1/3 stop from
reading to reading. This is definitely outside of the acceptable range for a
professional photographer by approximately 300%! In other words, that exceeds
professional limits for exposure control by 3 times.

Next week:
Rule #2 – If you don’t have custom white balance, you don’t have correct color.

To make sure you get the rest of this series, you can subscribe to this blog at the top of this page.